Robinhood
How to get started with trading on Robinhood
In this tutorial, we will show you how to create a simple automated trading bot that will make trades on Robinhood. This tutorial is intended for beginners who have little to no experience with writing code and those who are new to the Block Builder. At the end of this tuturial, you will have everything you need to start running your very own algorithmic trading bot.
First, you'll need to import the robinhood api into your trading bot. This will allow your bot to "talk" to Robinhood and make trades. Select Robinhood from the side tray and drag the "Import Robinhood" block into the workspace. Notice that if you hover over each block, you will see a small tooltip that will describe the block and its purpose.
Next you'll need to set up your login details. Your bot needs to be able to login to your account in order to make trades. Your password and the code itself is encrypted. Drag the "Login" block into the workspace and input your username and password. Remember that you do not need to enclose your username and password in quotes.
Now that your bot can access your account, we'll need to tell your bot to collect the information it needs to make trades. Select Time from the side tray and drag "Import Time" into the workpace. This will make your bot aware of the passage of time and allow you to schedule actions as needed.
Next we need to create a function. Most of your trading logic will be described in functions so it is a good idea to get familair with them. Select functions from the side tray. Drag the first function block and the function block with the same name into the workspace. Notice that the function block does not attach to the main body of our other blocks. Functions can stand on there own and can be invoked elsewhere in the code. This can be very helpful when designing more complex trading bots that need to perform many different operations throughout its lifecycle. Once the function is in place, change the name to something other than "do something". Function names should describe their purpose. For this tutorial, we'll just name it "trade". Note that you can also add your own description by clicking the ? icon.
Now that your function has been placed, we need to fill it with our trading logic. Select time from the side tray and drag "Sleep" into the function. Then select math and drag in the "Number" block, placing it in the "Sleep" block. We will set it so sleep for sixty seconds. This block will tell our bot to wait for the specified number of seconds before moving on the the next step in its logic. Many exchanges have some kind of rate limiting in place that prevents people from overwhelming their servers with too many requests. If we don't tell our bot to wait, there is a good chance it will be blocked by their servers.
Next we need to declare some variables that will store the information we need our bot to work with. Select variables from the side tray and the select create variable. We'll call this one "price". Repeat this step again to create another variable called "qty". These variables will store the price of a given stock and the quantity of shares we will be dealing with.
Select variables again and drag the "Set" block into the workspace below the "Sleep" block. From the dropdown, select price. Now go to Robinhood and drag the "Get latest price for" to the end of the "Set" block. Finally, select text and drag the empty quotes block to the end of the "Get latest price block". Enter "AAPL" into the empty field. This set of blocks will get the current price of Apple stock and store that price in memory for use later.

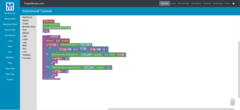
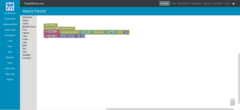
Now we need to input our trading rules for the bot to follow. Select logic and drag the "If do else" block into the function. Head to logic again and drag the "And" block next to the first open space on the "If do else" block in the workspace. Finally, head to logic one more time and drag two "=" blocks to the workspace. Place both blocks inside of the "And" block. This creates a conditional statement where our bot will only perform next step in our trade logic if two conditions are satisifed at the same time. Otherwise, it will skip that step and perform the next peration. Select the first "=" block and from the drop down, change it to less than or equal to. Select variables and drag the "price" variable into the first "=" block. Now select math and drag a "Number" block into the other empty slot on the "=" block. Set that number to 200. Do the same for the other "=" block except this time select the "qty" varaible and set the number to 0. We are now telling our bot that it sould only perform the next step if the price of our stock is less than $200 and we are currently not holding any shares already.
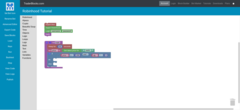
Now that we've set our conditons, it' time to make a trade. Select Robinhood and drag the "Place buy order at limit price for" block into the "do" section of our "if do else block". Right click the text block "AAPL" and select duplicate. Drag that new block into the fist empty field of our new block. Do that again for any number block, this time draging int the quantity field and set it to 10. Finally duplicate the price variable block and drag it to the price field. This will tell our bot to place a limit buy order for 10 shares for a maximum price of $200 per share. We will assume that when this logic executes, our trade will succeed. We now need to tell our bot that it has 10 new shares of our stock and that it must now loop through our logic again. Select variables and drag the "set to block" into the workspace. From the dropdown, select qty. Duplicate any "number" block and drag it to the end. Set the number to 10. Finally select functions and drag a "Trade" block (or the block that has the same name as your function), and add it to the end.

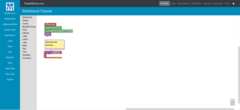
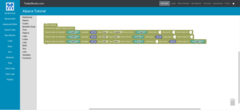
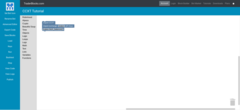
Now we need to tell our bot what to do if it has those shares and the price is high enough for us to make a profit. Drag a few more blocks into place until your workspace looks something like this.

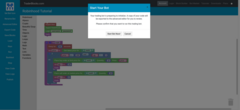
Your bot will now sell all your shares at market price when the price for your stock exceeds $220. The bot will continue to run through this logic every day until you tell it to stop. To run this trading bot, select "Run" form the side menu and then select "Start Bot Now!" from the pop up menu. To shutdown your bot select "Stop" from the side menu. All running bots will appear in the load menu. You can shutdown your bot from the load menu as well.
Congradulations, you now have everything you need to build your own trading bot. Keep in mind that, for the purposes of this tutorial, we kept our trading logic simple. You don't need a complicated strategy to make money, many successful bots are often simple. However, it pays to do your own research and develope a strategy that satisfies your investment goals and risk tolerances.
If you have any questions or if you would like to see other topics covered, email us at info@traderblocks.com
Alpaca
Getting started with Alpaca
In this tutorial, we will go over the functionality of the blocks used in building trading bots for the Alpaca platform. If you haven't already, checkout the first tutorial for Robinhood as that tutorial covers some addional details about the TraderBlocks platform itself that will not be covered here. This tutorial is designed to assist those with little to no coding experience and who have a basic understanding of how to use the Block Builder. The intent of this tutorial is to familiarize you with some of the common operations you may need to perform when implementing your own trading strategy.
First you will need to import the Alpaca API set up our login credentials. Select Alpaca from the side tray and drag in the "Import Alpaca" and the "Alpaca Paper Login" blocks to the workspace. Alpaca has separate API's for it's live and paper trading services. It is recommened to test your bot using the paper trading API first before running it live.

To make a trade, drag any of the "Submit Order" blocks into the workpsace. Each of these blocks will let you place an order, but each accept different parameters. Some of these blocks only let you place orders at market price, which is why they don't accept any inputs for a specific price. Others will let you set limit and stop prices for your trades. Every time you place an order, an order id is automatically generated and returned to your bot. You can store this id so that your bot can request information about a specific order later. Some blocks will also let you set unique client order ids. These are ids can be used by your bot to track a specific order and collect updates about its status.
To get information about your account and current positions, you can utilize the "Get Account Info", "Get Current Positions", and "Get Position" blocks. These blocks will return an object that you can use to pull in the information you want your bot to work with such as the amount of cash in you account, or the number of shares you have. To access information within the returned object, you will need to perform the following actions. Create two new variables called "account" and "cash". Drag the "Set Variable" block into the workspace and set it to "account". Then drag the "Get Account Info" block and add it to the end of the "Set Variable" block. Drag another "Set Variable" block and set it to "cash". Drag the "Object" block into the workspace and add it to the end of the new "Set Variable" block. In the "Object" block, type "account" in the first field and "cash" in the other.
Alpaca also allows you to work with barsets. Barsets will, for a specified ticker symbol and iso time, return the barset values for that symbol. Returned follow the following format:
{'AAPL': [Bar({'c': 236.22, 'h': 237.64, 'l': 232.3075, 'o': 232.95, 't': 1570766400, 'v': 75801862})]}
The returned results include the ticker symbol 'AAPL', closing price 'c', the high price 'h', the low price 'l', the open price 'o', the beginning time of this bar as a Unix epoch in seconds 't', and the volume 'v'. Getting specific values from the returned object follows a procedure similar to the one we covered for getting account info. In this case we use another object block that accepts four parameters. The name of the variable that stores the barset object, the specified ticker symbol, the index of a specific bar (default is 0), and the letter of our desired barset value.
If you have any questions or if you would like to see other topics covered, email us at info@traderblocks.com
CCXT
Getting started with CCXT
In this tutorial, we will go over the functionality of the blocks used in building trading bots for the CCXT platform. If you haven't already, checkout the fist tutorial for Robinhood as that tutorial covers some addional details about the TraderBlocks platform itself that won't be covered here. This tutorial is for those with little to no coding experience and who have a basic understanding of how to use the Block Builder. The intent of this tutorial is to familiarize you with some of the common operations you may need to perform when implementing your own trading strategy.
First, it's important to understand that CCXT does not work in the same way as Robinhood or Alpaca. CCXT is not an exchange, but rather a collection of public APIs from many different cryptocurrency exchanges from all over the world. As a result, there are a few extra things you will need to be aware of when trying to trade with these exchanges. Some exchanges may require additonal parameters when performing common tasks such as authenticating or making trades.
To get started, drag the "Import CCXT" and "Import exchange" blocks into the workspace. Unlike previous examples the "Import exchange" block requires you to specify the exchange you want your bot to trade with in additon the the standard api and secret keys. To set the exchange, just type the name of the exchange into the first field. In this example, we will use kraken. Placing trades follows the same pattern. Anytime you want to buy or sell, you must specify the exchange you want to buy or sell on. This can allow you to create a bot that takes advantage of arbitrage opporunities by trading across multiple exchanges at the same time.

For situations where you need to call api's that are not currently supported, you can utilise the empty block as a stopgap solution. The empty block accepts any input as standard python code, allowing you to inject code as needed. Drag the empty block to the workspace and enter "kraken.fetch_balances()". Select "View Code" on the side tray to see the final result.
If you have any questions or if you would like to see other topics covered, email us at info@traderblocks.com
API Keys Manager
The API Keys Manager provides you with a simple and secure means of storing the api keys needed for your bot. Rather than inputing your credentials manually, the API Key manager allows your bot to securely reference your keys only when needed. This is especially useful when you want to publish your bot as users will not have to input their keys before running the bot.
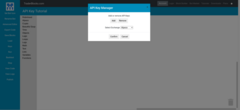
Adding API keys is simple. Click the "Keys" button on the side bar which will show you the popup for the Key Manager.
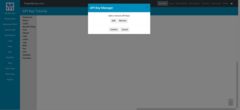
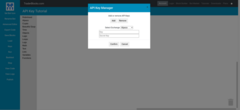
The popup has two options, "Add" and "Remove". Selecting "Add" will show the input fields for your keys and a dropdown for the exchange you want to associate with those keys. Once you have completed the form, hit "Confirm".
Keep in mind that if you want to trade cryptocurrencies, you can only set keys for one CCXT supported exchange at a time. A bot can still trade across multiple crypto exchanges at once, but they cannot rely on the API Key Manager for authentication.
Removing your API keys can be done by selecting the "Remove" option and picking an exchange from the dropdown menu. Then hit "Confirm".
Some crypto exchanges will require more that just your API keys to complete authentication. If you still wish to use the API Keys Manager, you can do so with the API keys block with the Options field. The options field will allow you to provide addtional key pair values as needed.
If you have any questions or if you would like to see other topics covered, email us at info@traderblocks.com
Logging
In order to monitor your bots activity, you can instruct it to create logs as it runs. Logs can help you to better understand how your bot performs overtime or help you fix any bugs you might find. All bots are preconfigured to capture and store logs so can focus on more creating a winning strategy and less on writing code.
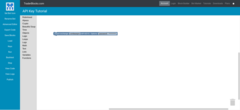
Getting started with logs is easy. In the side tray there is a Logs tab that contains two blocks that will allow your bot to produce logs. The first block accepts only text and the second an object. Objects can contain almost anything and will likely be your primary solution for capturing valuable information as your bot runs.
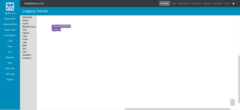
For our purposes, we've set up this simple bot to demonstrate some common scenarios were logging can be useful. This bot will periodically check the price of a given stock and log the price. For more information abput how we are capturing this information, refer to our Alpaca tutorial.
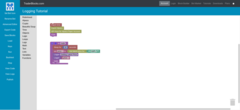
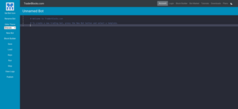
Once we start the bot, in few minutes we will be able to start viewing the log output by hitting the View Logs button. If the log blocks are not used or if there was an error in the code, you should see a warning message instead of the log output.

If we hit the View Code button, we can see that under the hood, the log blocks create a "logger.info()" line. This line can be used in the Advanced Editor as well to achieve the same result.

If you have any questions or if you would like to see other topics covered, email us at info@traderblocks.com
Advanced Editor
The Advanced Editor allows users to build stock trading algorithms provided they have the requisite coding experience. While the Block Builder is designed to aid users who are new to coding, the Advanced Editor caters to those who have some coding experience and who prefer to utilize more traditional development tools.
The Advanced Editor has some addtional options not present in the Block Builder. You can create a new bot by clicking the "New Bot" button on the side tray. This will then prompt you to enter a new name for your bot and select a template. Each template contains examples of code you may find useful when interacting with each exchange. There are also links to addtional documentation should you require it. You can also change the editor theme by selecting the dropdown under "Editor Theme" in the side tray.
If you have any questions or if you would like to see other topics covered, email us at info@traderblocks.com